

🌡 Why I monitored my fridges in Home Assistant
With the summer heatwave, I wanted to monitor my fridges and freezer for a very simple reason: Avoid the unpleasant surprise.
A poorly closed door, a drifting probe or a device that starts to tire, and you can quickly lose all the content without realising it.
I chose to set up a full follow-up in Home Assistant, with sensors, notifications, a dedicated screen and a visual alert on the dashboard.
The idea was not just to read a temperature, but to see right away if something was out of the ordinary.
🧊 The sensors I retained
I separated the surveillance into several areas to keep something legible and easy to maintain.
I have a sensor for the freezer, one for the fridge on the left, one for the fridge on the right and one for the fridge in the pantry.
The entities I use are the following, they are inherited from the different temperature sensors. I did not bother to make them homogeneous because they are used elsewhere:
sensor.temperature _freezer _temperaturesensor.frigo_left _tdeg _temperaturesensor.frigo_right _tdeg _temperaturesensor.frigo_cellier_temperature_frigo_cellier
For fridges, I have chosen an alert threshold of 10°C. For the freezer, I have chosen -5°C.
This is not a “generic” logic, it is really adapted to what I want to monitor at home.
📈 The screen I created
I then put all this together in a dedicated view in Home Assistant. I called this page Controls, with a fridge icon, to have all my cold equipment in one place.

On this screen, I put 7-day temperature charts and a chart of the day.
It allows me to quickly see if a temperature variation corresponds to abnormal behavior or a simple door opening.
I also have a ‘warn me’ button, I explain this right after.
🗓 Temperature charts
For each fridge and freezer, I added a temperature graph with a red annotation at the threshold. This is very convenient because you immediately see when the curve approaches the limit.
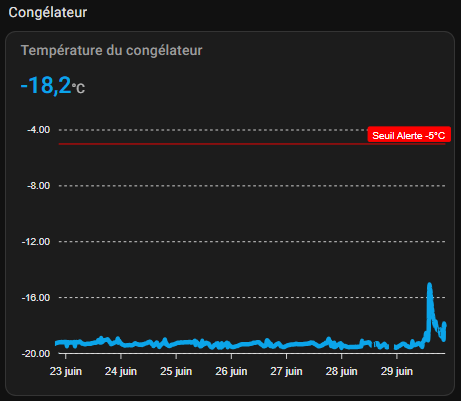
I use custom:apexcharts-card for this, with two different views: one over 7 days and one over the current day. The whole thing remains legible, even when I compare several days in a row.
Type: custom:apexcharts-card header: show: true title: Freezer temperature show_states: true colorize _states: true graph_span: 7d series: - entity: sensor.temperature _freezer _temperature color: "#0ba4e9" show: name_in _header: false apex _config: yaxis: - min: -4 max: -20 annotations: yaxis: - y: -5 borderColor: "#FF0000" strokeDashArray: 0 label: borderColor: "#FF0000" style: color: "#FFF" background: "#FF0000" text: Alert threshold -5°C
🧩 I started by creating my helpers
Before I even took care of the alert buttons, I created my helpers in Home Assistant. I used input_boolean under the heading Entries, to have one switch per device.
I wanted something simple: if the alert is activated, Home Assistant notifies me; If it's turned off, it doesn't bother me.
It also allows me to temporarily disable the notification if a message has already been sent.
It allows me to stay in control, without touching the automation itself.

🔘 Alert buttons
I have also added one button per device to enable or disable notifications. This corresponds to the input_boolean created just before.
I wanted to be able to temporarily cut off alerts when I know I'm going to open the door for a long time, or when I do a cleaning.
The button simply displays “Enabled” or “Disabled”, which avoids getting lost in the technical states. It is a detail, but for everyday use it makes the screen clearer.
Type: tile entity: input_boolean.prevenir_si_souci_de_temperature_freezer name: Notify me if temperature alert threshold exceeded features_position: vertical bottom: false tap_action: Action: toggle icon_tap_action: Action: toggle state _display: >- {% if is_state('input_boolean.prevenir_si_souci_de_temperature_freezer', 'on') %} Activated {% else %} Disabled {% endif %}

🔔 The notifications I have put in place
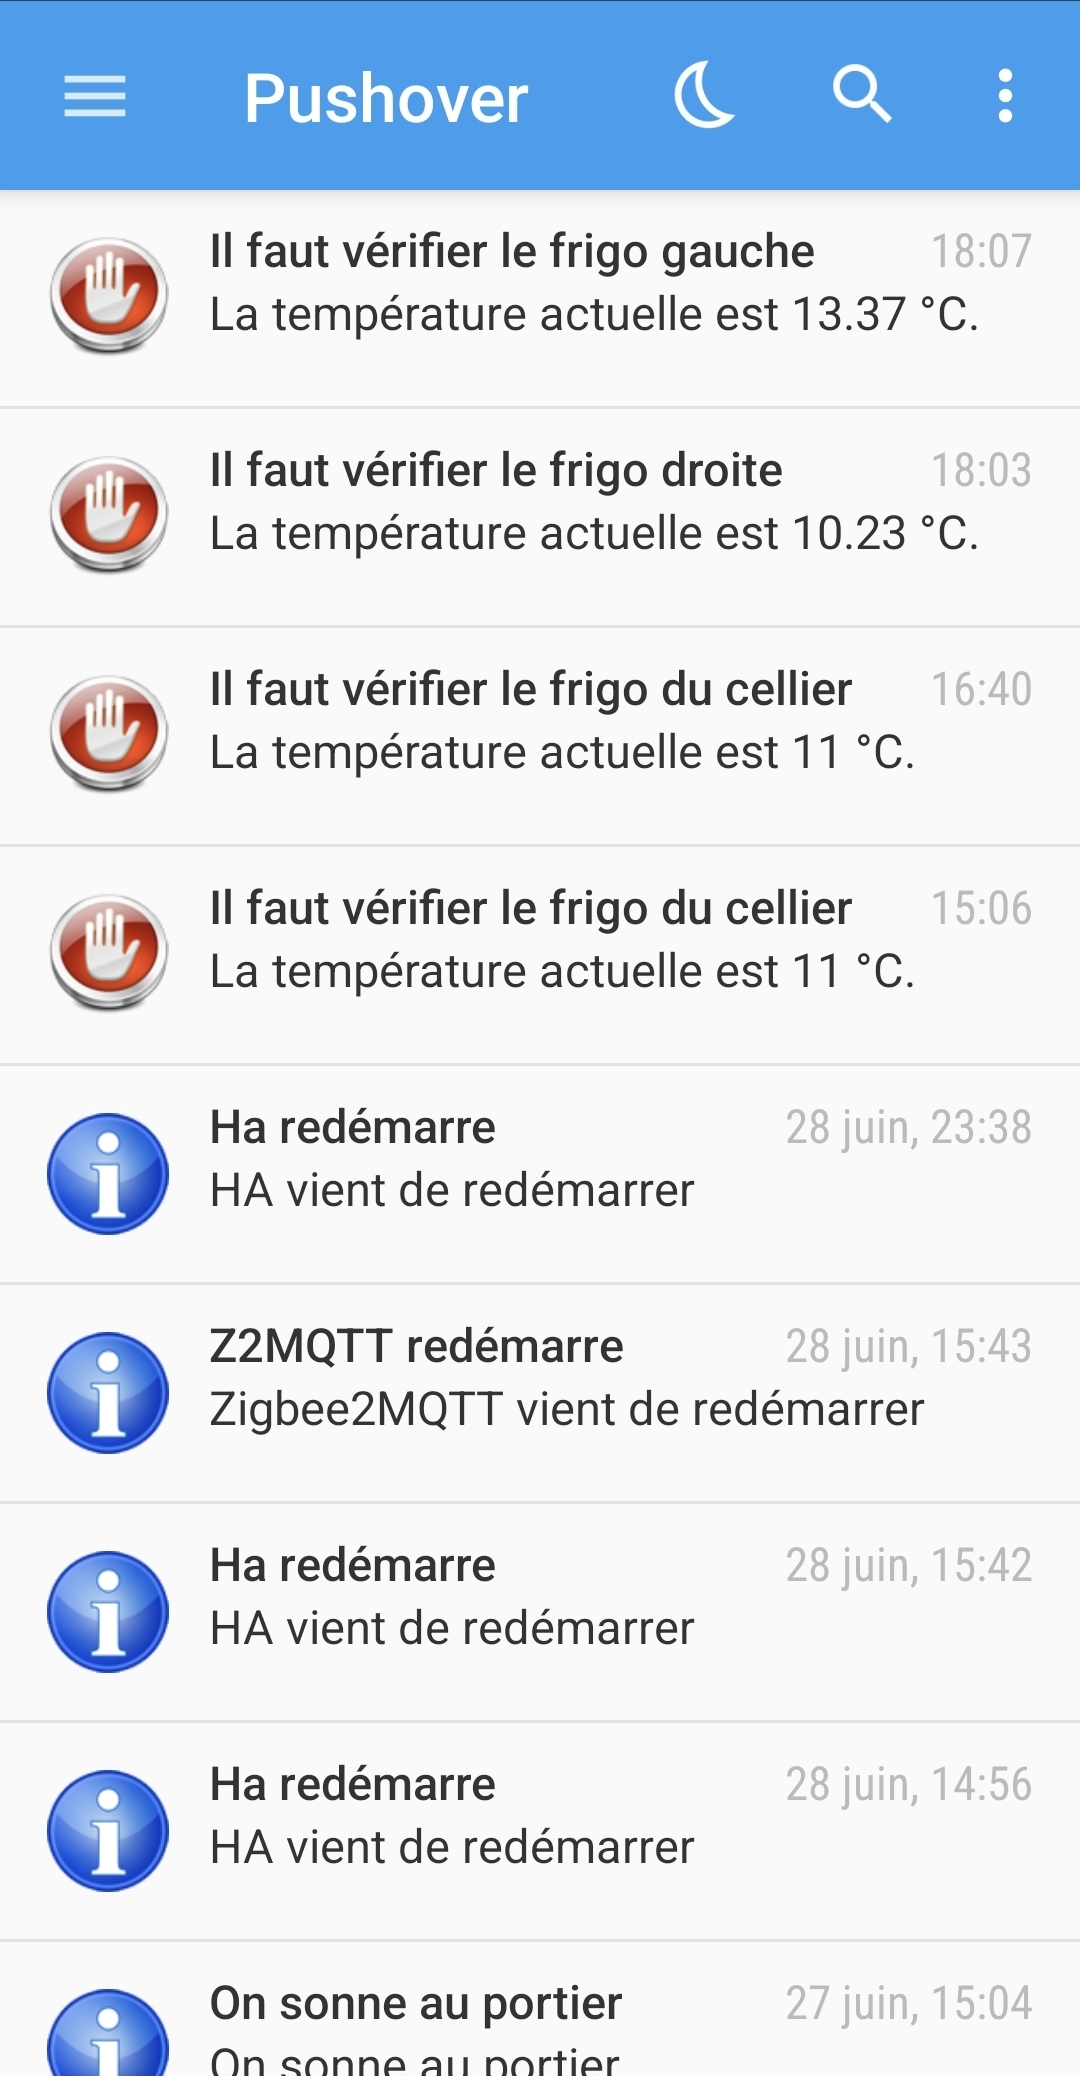
When the temperature exceeds the threshold, I send two types of notifications: a visual notification and an SMS.
I wanted something reliable, because a fridge or freezer problem deserves to be seen quickly.
I only trigger the alert if the input_boolean corresponding is activated. Then the automation cuts the same button to avoid receiving a flood of notifications until the problem is solved.
I'm not documenting my notifications here. I use Pushover to warn me with notify.icone _rouge and my wife is on Free, so notify.sms _christel _via _free.
🧾 The automation of the freezer
The freezer operates on a slightly different logic from the refrigerators, with a threshold set at -5°C. As soon as the temperature rises above this value, the alert is triggered if monitoring is activated.
alias: Control Temperature Freezer Description: "" Triggers: - trigger: state entity _id: - sensor.temperature _freezer _temperature conditions: - condition: and conditions: - condition: state entity _id: input_boolean.prevenir_si_souci_de_temperature_freezer state: "on" - condition: numeric _state entity _id: sensor.temperature _freezer _temperature above: -5 actions: - action: notify.icone _rouge data: Message: >- The current temperature is {{ states('sensor.temperature _freezer _temperature') }} °C. title: Check the freezer - action: notify.sms _christel _via _free data: Message: >- The current temperature is {{ states('sensor.temperature _freezer _temperature') }} °C. title: >- The current temperature is {{ states('sensor.temperature _freezer _temperature') }} °C. - action: input_boolean.turn_off target: entity_id: input_boolean.prevenir_si_souci_de_temperature_freezer mode: single
🌡 Automation of the left fridge
I made exactly the same logic for the left-hand fridge, with a threshold of 10°C. Again, the idea is to prevent it only if the surveillance is active.
alias: Control Temperature Fridge Left Description: "" Triggers: - trigger: state entity _id: - sensor.frigo_left _tdeg _temperature conditions: - condition: and conditions: - condition: state state: "on" entity _id: input_boolean.prevenir_si_souci_de_temperature_frigo_left - condition: numeric _state entity _id: sensor.frigo_left_tdeg_temperature above: 10 actions: - action: notify.icone _rouge data: Message: >- The current temperature is {{ states('sensor.frigo_left _tdeg _temperature') }} °C. title: Check the left fridge - action: notify.sms _christel _via _free data: Message: >- The current temperature of the left fridge is {{ states('sensor.frigo_left _tdeg _temperature') }} °C. title: >- The current temperature of the left fridge is {{ states('sensor.frigo_left _tdeg _temperature') }} °C. - action: input_boolean.turn_off target: entity_id: input_boolean.prevenir_si_souci_de_temperature_frigo_left mode: single
🚪 The right fridge and the pantry
I have reproduced the same structure for the fridge on the right and for the fridge in the pantry. The principle is always the same: a sensor, a threshold, an alert button, a notification, and then an automatic shutdown to avoid duplication.
alias: Control Temperature Fridge Right Description: "" Triggers: - trigger: state entity _id: - sensor.frigo_right _tdeg _temperature conditions: - condition: and conditions: - condition: state state: "on" entity _id: input_boolean.prevenir_si_souci_de_temperature_frigo_right - condition: numeric _state entity _id: sensor.frigo_right _tdeg _temperature above: 10 actions: - action: notify.icone _rouge data: Message: >- The current temperature is {{ states('sensor.frigo_droite _tdeg _temperature') }} °C. title: Check the right fridge - action: notify.sms _christel _via _free data: Message: >- The current temperature of the right fridge is {{ states('sensor.frigo_droite _tdeg _temperature') }} °C. title: >- The current temperature of the right fridge is {{ states('sensor.frigo_droite_tdeg _temperature') }} °C. - action: input_boolean.turn_off target: entity_id: input_boolean.prevenir_si_souci_de_temperature_frigo_right mode: single
alias: Control Temperature Fridge Cellier Description: "" Triggers: - trigger: state entity _id: - sensor.frigo_cellier_temperature_frigo_cellier conditions: - condition: and conditions: - condition: state state: "on" entity _id: input_boolean.prevenir_si_souci_de_temperature_frigo_cellier - condition: numeric _state entity _id: sensor.frigo_cellier_temperature_frigo_cellier above: 10 actions: - action: notify.icone _rouge data: Message: >- The current temperature is {{ states('sensor.frigo_cellier _temperature _frigo_cellier') }} °C. title: It is necessary to check the fridge of the pantry - action: notify.sms _christel _via _free data: Message: >- The current temperature of the cellar fridge is {{ states('sensor.frigo_cellier _temperature _frigo_cellier') }} °C. title: >- The current temperature of the cellar fridge is {{ states('sensor.frigo_cellier _temperature _frigo_cellier') }} °C. - action: input_boolean.turn_off target: entity_id: input_boolean.prevenir_si_souci_de_temperature_frigo_cellier mode: single
🟥 Conditional cards on the dashboard
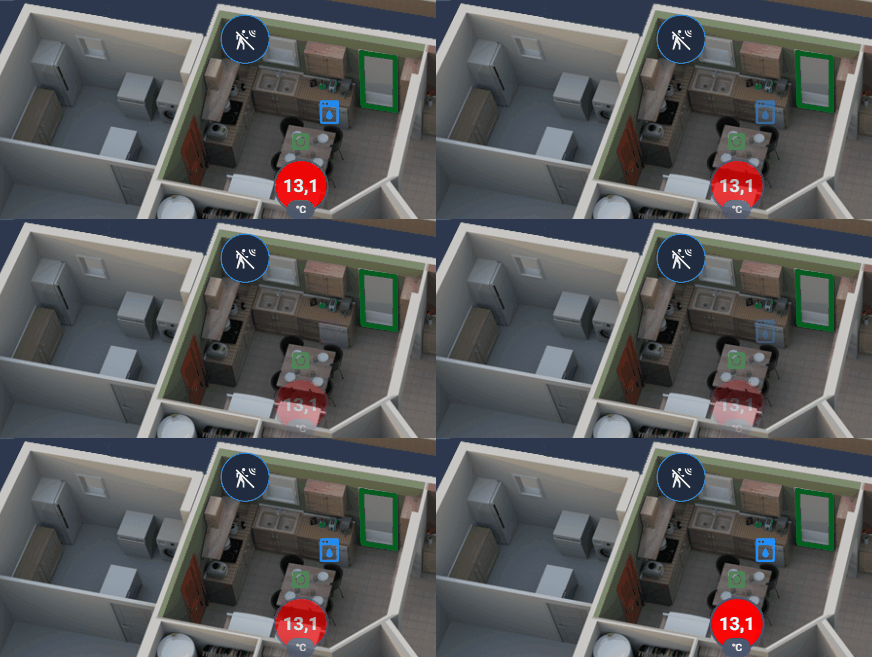
I wanted to go a little further than just notifications. On my main view of the dashboard, I also display a red badge flashing directly on the plan when a fridge exceeds its threshold.

The principle is simple: as long as everything is fine, nothing appears. As soon as a sensor passes above the threshold, the card is displayed at the intended location and immediately catches the eye.
🧩 The decluttering template I use
To avoid repeating the same block for each device, I created a template decluttering. It allows me to reuse the same structure with only the sensor, name, position and threshold changing.
decluttering _templates: fridge: element: Type: conditional conditions: - condition: numeric _state entity: "[[sensor]]" above: "[[threshold]]" style: top: "[[top]]" left: "[[left]" elements: - type: state-badge entity: "[[sensor]]" name: "[[name]]" style: font-size: 15px text-align: center font-weight: bold color: white "--label-badge-text-color": white "--label-badge-background-color": red "--ha-label-badge-label-color": white
Then I simply call it with the variables of each device:
- type: custom:decluttering-card template: Variable fridges: - sensor: sensor.frigo_left_tdeg_temperature - name: Left - top: 62% - left: 29% - temperature threshold: 10 card_mod: style: | @keyframes blinker { 50% { opacity: 0; } } :host { animation: blinker 2s linear infinite; }
Note that I did not manage to integrate card_mod in the decluttering. I therefore reproduced it directly on the dashboard.
I took up the same principle for the right-hand fridge, the pantry and the freezer, with their respective positions on the plan.
For the freezer, of course, the threshold remains at -5°C, since the monitoring logic is not the same as for fridges.
✅ What I won with this implementation
In the end, I now have a clear, visual and useful monitoring of my cold equipment.
I see the history, I get an alert if needed, and I have an immediate visual indicator in general if something exceeds the threshold.
What I like most is that everything is easy to read on a daily basis.
I do not need to go to the menus to find out if a fridge is starting to heat: either I see it on the dashboard, or I receive a notification.
🛠 Small choices that make a difference
The mix of graphics, notifications and conditional badges works really well for this use case.
It is not a gadget: it is a real supervision of comfort and safety for the home.
And since I kept a reusable structure, I can easily add another device later without doing it all over again.
🎯 Conclusion
I did not try to do anything complicated.
I simply wanted to know at all times whether my fridges and freezer remained in the right temperature range, and to be notified as soon as a threshold was exceeded.
With Home Assistant, a few sensors, well-thought-out automations and a clear dashboard, I now have a system that speaks to me right away when action is needed.
And for me, this is exactly what is expected of good home automation: be useful, discreet and reliable.
 English
  French
  Spanish
  Chinese
  German