

NB : To enlarge the images: right-click / open the image in a new tab
/!\ ATTENTION /!\ below 30% battery displayed on Jeedom there is a decrease in the reliability of the info, around 20% a LOW BATTERY display is visible on the LCD with loss of Bluetooth
When we start home automation, we start groping and our choices quickly turn to the cheapest products. Many of us start with a brand that is not (too) expensive and with a good reputation, Xiaomi!
Given the price, many of us choose this product:
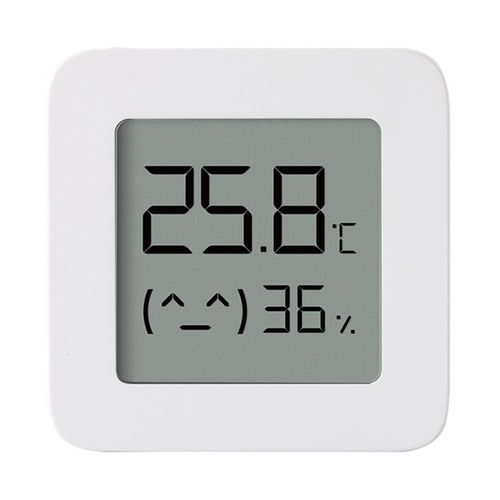
But as we start at that moment in home automation, we do not imagine the galley in which this small, beautiful and cheap thermometer will put us!
What is needed:
- A sensor
- A Jeedom with a Bluetooth antenna (local or deported)
- BLEA (plugin)
- JeeXplorer (plugin)
- A PC / Mobile with Bluetooth
There are several topics that explain how to hack BLEA with the BindKey, flash and hack or touch nothing and use a Xiaomi gateway combined with an Alexa skill and bring it up in Jeedom thanks to the AlexaAPI/smarthome plugin.
Let us pay tribute to all those who have worked by quoting them from these sources:
https://github.com/atc1441/ATC_MiThermometer
http://atcnetz.blogspot.com/2020/09/custom-firmware-fur-das-4-xiaomi.html
https://github.com/pvvx/ATC_MiThermometer#bluetooth-advertising-formats
https://community.jeedom.com/t/refresh-xiaomi-lywsd03mmc/17216
https://community.jeedom.com/t/valeurs-non-remontees/44590/10
https://community.jeedom.com/t/refresh-xiaomi-lywsd03mmc/17216/77
Each method has its advantages and disadvantages:
AlexaAPI/smarthome:
Advantages:
- No hacks
- Very simple
- No flashing
Disadvantages:
- Requires Xiaomi Bluetooth Gateway
- Have Alexa
- Holes in the lifts (very rare but annoying when driving a heater)
- Not CloudFree (Internet-dependent)
BLEA with the BindKeys:
Advantages:
- CloudFree (Internet-dependent)
- No flashing
Disadvantages:
- Complex (recovery @MAC, BindKey)
- Holes in the lifts (very rare but annoying when driving a heater)
- Changing BindKey if connecting to MihHome/Other
- Have a Bluetooth antenna
- Installation of a key decryption dependency
BLEA with flashing:
Advantages:
- Simple
- Adjustable sensor
- Reassembled without hole (or not yet seen to date)
Disadvantages:
- Flashing
- Have a Bluetooth antenna
Even all this is not so complicated, even very simple in some cases, it is not necessarily the vision that one can have at the beginning. I have struggled, groped, made mistakes for a long time and often did not understand very simple things.
That is why I am writing this tutorial on the last solution, making it as popular as possible for the Jeedom beginner.
Why choose this method?
I tested them all and I was never really satisfied, too much hole in the lift, or too much holding constraint. Finally I remained on the most stable to my taste AlexaAPI/smarthome. I did not retain flashing at the time because there was no way to integrate it into BLEA.
The new firmware has finally convinced me, because this solution seems to me the most stable in terms of lifts, better battery optimization and the disadvantages can be considered advantages.
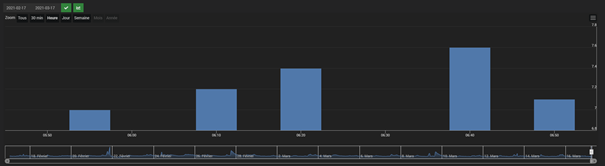
For comparison on 1H with my probes still under Alexa:
Alexa
BLEA flashed
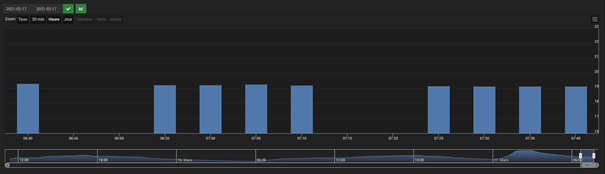
Unappealable finding!
Important reminder:
For those who would like to compare the different methods in the longer term, I would remind you that by default the records are smoothed/averaged beyond 2 hours every day at the CRON for archiving (approximately 4 hours) with 1 average value per hour:
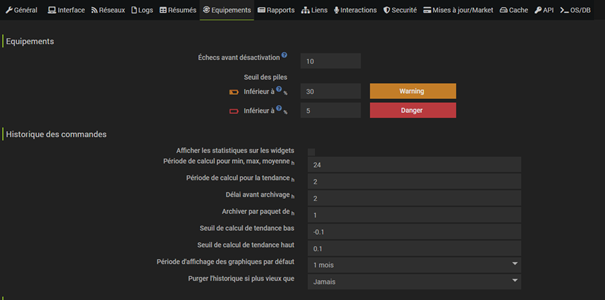
This can be seen in the form of:
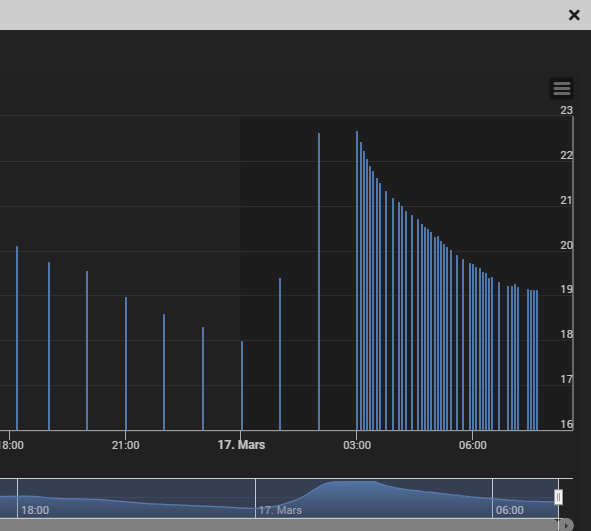
So it will be necessary to change these parameters for an objective comparison.
- Flashing
Even if the old flashing method proposed by Aaron Christophel was already quite good
https://atc1441.github.io/TelinkFlasher.html
https://github.com/atc1441/ATC_MiThermometer
http://atcnetz.blogspot.com/2020/09/custom-firmware-fur-das-4-xiaomi.html
Victor pvvx took it over and improved it!
https://github.com/pvvx/ATC_MiThermometer
https://pvvx.github.io/ATC_MiThermometer/TelinkMiFlasher.html
In summary, this new version offers automatic charging of the latest firmware, battery optimisation, as well as a multitude of additional settings (including physical action trigger on the test spindle, it will be necessary to weld for this:p )
Go to the page https://pvvx.github.io/ATC_MiThermometer/TelinkMiFlasher.html
Note: If you have a sensor already flashed in the format T1441, it is possible that you have to either go through the flasher T1441 to return the Xiaomi firmware, or use the page https://pvvx.github.io/ATC_MiThermometer/TelinkOTA.html and to perform an OTA update from T1441 to PVVX. Then go back to the PVVX flasher to change the settings.
- Activate PC/Mobile Bluetooth before attempting to connect
- Enter "LYWSD03" in "BLE device name prefix filter" (this allows to have only Xiaomi thermometers), "ATC" will allow to put the filter for an already flashed thermometer
- Tap "Connect" and select your thermometer
- Wait until the connection is established
- Press "Do Activation"
- Wait for the recovery of Xiaomi keys
- Press "Custom Firmware ver 2.x"
- Note the button next to it is the one to return the basic Xiaomi version
- Press "Start Flashing"
- Flash takes several seconds to see several minutes
- If this is not done on its own, press "Reconnect"
- Unless there is a particular need, I recommend that only two values be affected:
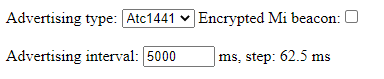
- Advertising type is the format of the frames, by default is on ‘ALL’ and therefore also sends frames in Xiaomi format, which I think is the crazy source of values that you will see in the last video because I forgot to change this parameter at the beginning.
So we choose Atc1441 because it is for this format that the code that will be used later has been developed and 5000ms.
Choosing ‘Atc1441’ instead of ‘ALL’ avoids inconsistent temperatures (e.g. 3000°C), in addition to keeping the "ALL" will waste battery for unnecessary info and divide by 4 the publication of the format that interests you.

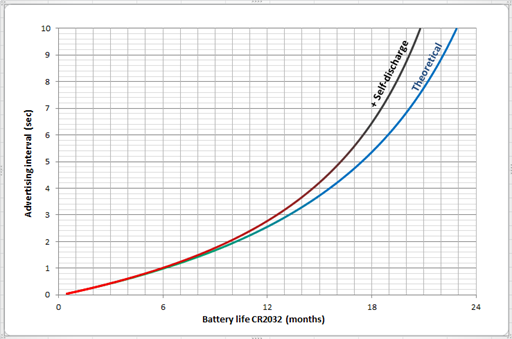
- Advertising interval is the refresh value of frames, I chose this value because it makes it possible to optimise the battery life of 7 months without affecting the refresh frequency too much.
- Once the settings are selected press "Send Config"
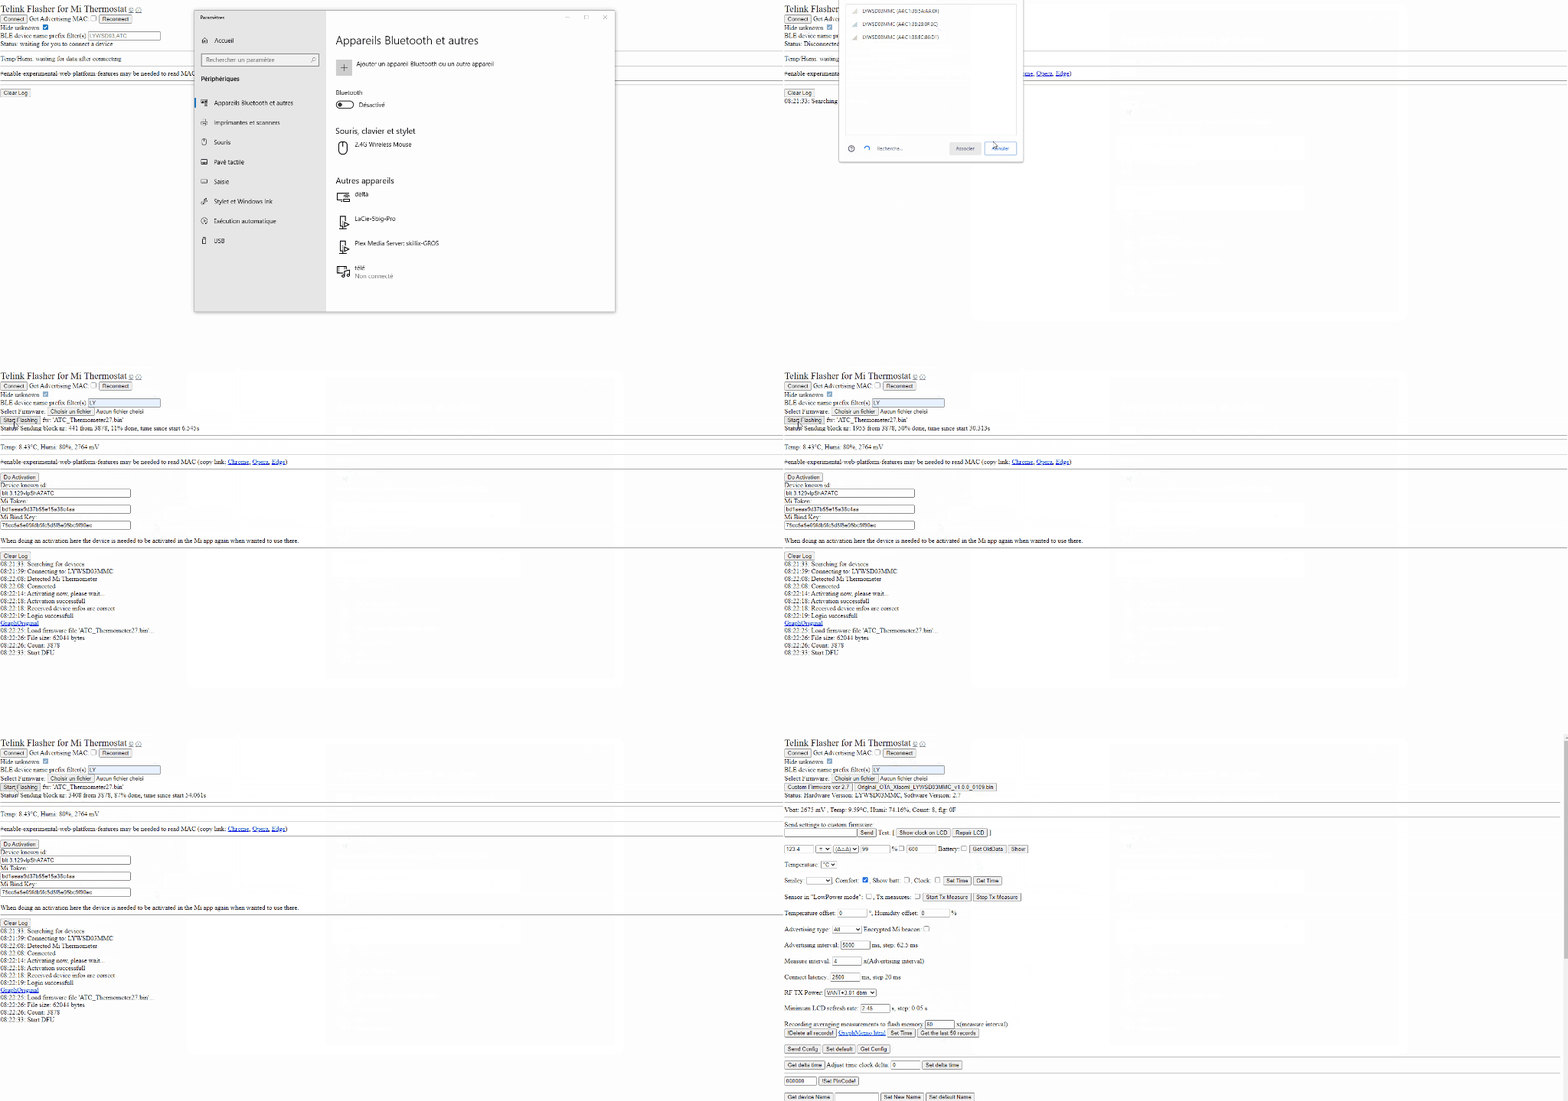
Here's the flashing is over!
- Editing lywsd03.py file
Note: it seems that the original .Py manages to read this flashed version without modification (to be confirmed), the code difference (parse) would allow to go back the data (noted in header) at the time of the verification of the presence without establishing a connection, a bit like if you were looking for a wifi network and that behind the name there was information in clear. So the following code can be useful to indirectly force the refresh without blocking the probe.
When you are used to Jeedom it may seem silly, but when you start you wonder how to modify a file; Winscp does not work without root right, PuTTY is impractical if you are not fully familiar with linux…
The answer is simple, JeeXplorer!
JeeXplorer is an ‘explorer’ plugin as its name suggests, it allows, modifying, creating, deleting files/folders
- Open JeeXplorer
- Navigate the tree to html/plugins/blea/resources/blead/devices/
- Save the file lywsd03.py
- Right click
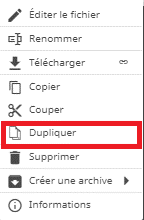
- Leave the duplicated file it will serve if you ever want to restore it
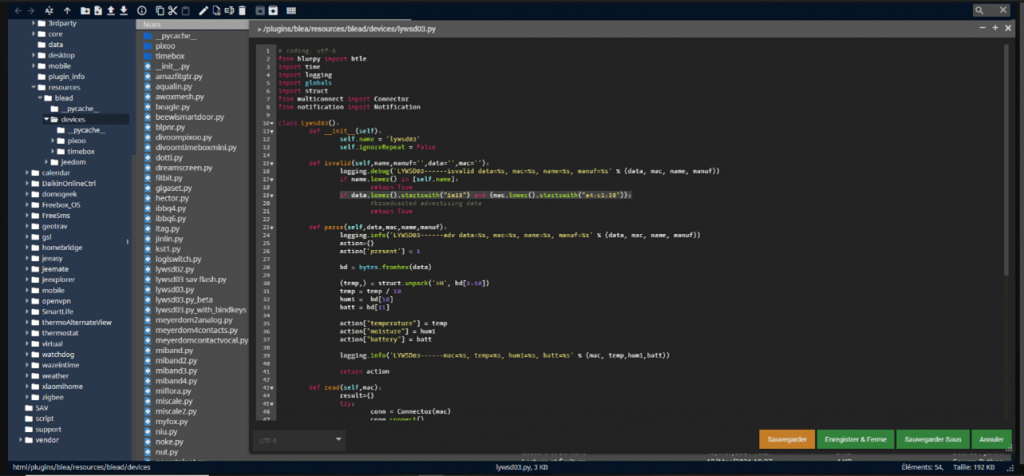
- Edit the file (right-click edit or double-click left) with the code with the code of dudusse optimized by DrKamp and amended by skillix to take into account negative values:
# coding: utf-8 from bluepy import btle import time import logging import globals import struct from multiconnect import Connector from notification import Notification class Lywsd03(): def __init __(self): self.name = 'lywsd03' self.ignoreRepeat = False def isvalid(self,name,manuf='',data='',mac=''): logging.debug('LYWSD03-----isvalid data=%s, mac=%s, name=%s, manuf=%s' % (data, mac, name, manuf)) if name.lower() in [self.name]: return True if data.lower().startswith("1a18") and (mac.lower().startswith("a4:c1:38")): #broadcasted advertising data return True def parse(self,data,mac,name,manuf): logging.info('LYWSD03-----adv data=%s, mac=%s, name=%s, manuf=%s' % (data, mac, name, manuf)) action={} action['present'] = 1 bd = bytes.fromhex(data) (temp,) = struct.unpack('>H', bd[8:10]) if temp > 60000: temp = 0 - ( 65530 - temp ) temp = temp / 10 humi = bd[10] batt = bd[11] action["temperature"] = temp action["month"] = humi action["battery"] = batt logging.info('LYWSD03-----mac=%s, temp=%s, humi=%s, batt=%s' % (mac, temp,humi,batt)) return action def read(self,mac): result={} try: conn = Connector(mac) conn.connect() if not conn.isconnected: conn.connect() if not conn.isconnected: return batt = bytearray(conn.readCharacteristic('0x3a')) battery = batt[0] notification = Notification(conn,Lywsd03) notification.subscribe(10) result['battery'] = battery result['id'] = mac logging.debug('LYWSD03-----'+str(result)) return result except Exception as e: logging.error(str(e) return result def handlenotification(self,conn,handle,data,action={}): result={} if hex(handle) == '0x36': has = bytearray(data) temperature = float(received[1] * 256 + received[0]) / 100 moisture = received[2] result['moisture'] = moisture result['temperature'] = temperature result['id'] = conn.mac result['source'] = globals.daemonname globals.JEEDOM_COM.add _changes('devices::'+conn.mac,result) globals.COMPATIBILITY.append(Lywsd03)- Save and quit
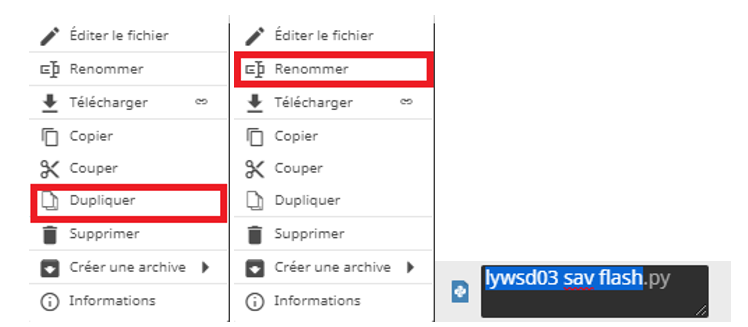
- Back up your file by duplicating and renaming it
- BLEA:
- Relaunch the demon
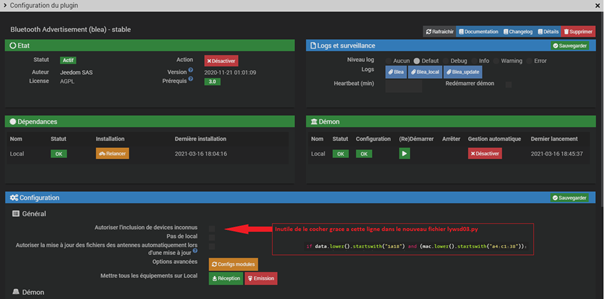
/ ! IMPORTANT \: if you use a deported antenna, think about

And

- Run a scan
- / ! \ Remember to cut the Bluetooth of the PC/Mobile as it is still connected and this is the case the sensor and will not be detectable or to check that the @ MAC is not already in the unknown devices of BLEA
- Choose lywsd03 and follow the classic inclusion
- Uncheck Forced Refresh
- Check historiser if you want to have graphs or check your lifts
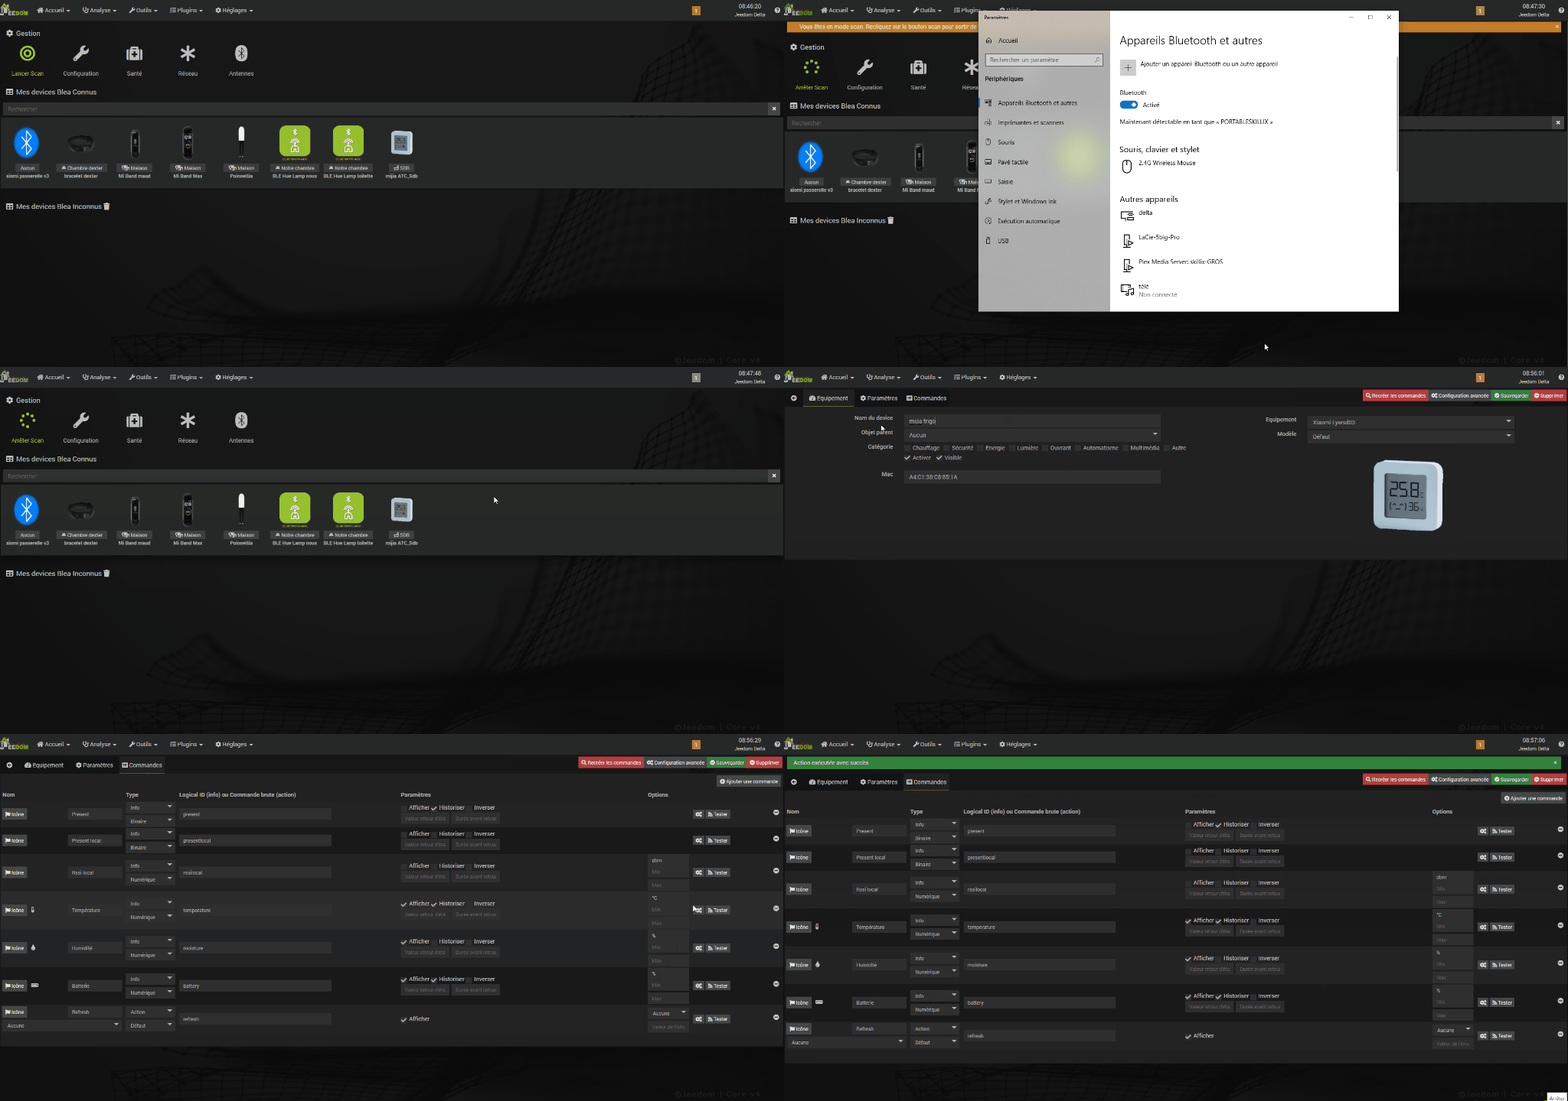
That's it, you're done!
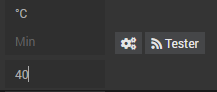
NB: If you have wild temperatures, check that you have changed the adversering type, if this is the case you can use a second security by applying a maximum value:

Bonus - Alexa plugin (ASH)
For those who would like to send their thermometers to Alexa for voice access, here is how to configure them:
- Find are equipment in Alexa plugin, check transmit, choose the type temperature sensor

- If you met a NOK (It also works with the okay) click on it, it tells you what it needs

- Report them on the appropriate order:

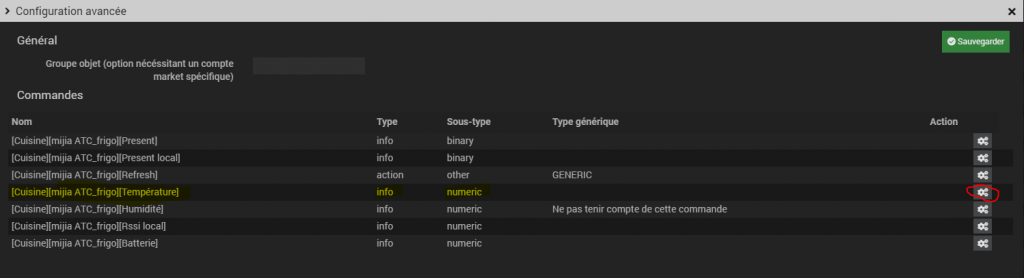
Then, gear temperature control
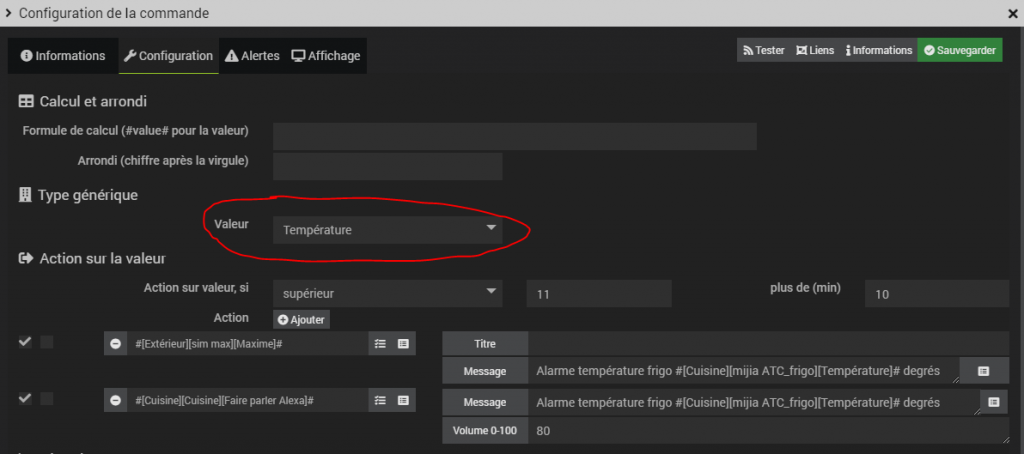
- Back up, go back to the Alexa plugin, back up again.
- Run a scan on the ALEXA application
Normally your thermometer is discovered and OK in the plugin.
Bonus Bonus
In the last image, I set my temperature control to be notified (vocal and sms) if my fridge goes above 11 degrees for more than 10 minutes. This avoids creating scenarios.
 English
  French
  Spanish
  Chinese
  German