


There are several ways to check its water consumption, here I have chosen to place a hall-effect turbine at the exit of my hot water tank (water heater), this turbine is equipped with a temperature sensor, I have also put a turbine on the cold water network (optional).

Objectives
- Knowing how much hot water is consumed (by volume), knowing the flow rate is possible but I did not use it
- Know the temperature of the water coming out
- Know the consumption of cold water (with a second turbine)
- That the whole is completely autonomous and searchable by wifi
- Control of the cost of the whole
- Possibility to replace active elements without disassembly
|
Edit January 2025: This page has been significantly updated by replacing the D1 mini with its latest version, the D1 Mini V4. And I replaced ESP Easy with ESP Home (for easier integration with Home Assistant). New page: I domotise my water consumption |
Necessary equipment and cost
- A Hall Effect Turbine in 3/4 with integrated temperature sensor (10.90th port included)

- If it is for cold water, there are versions without thermometer
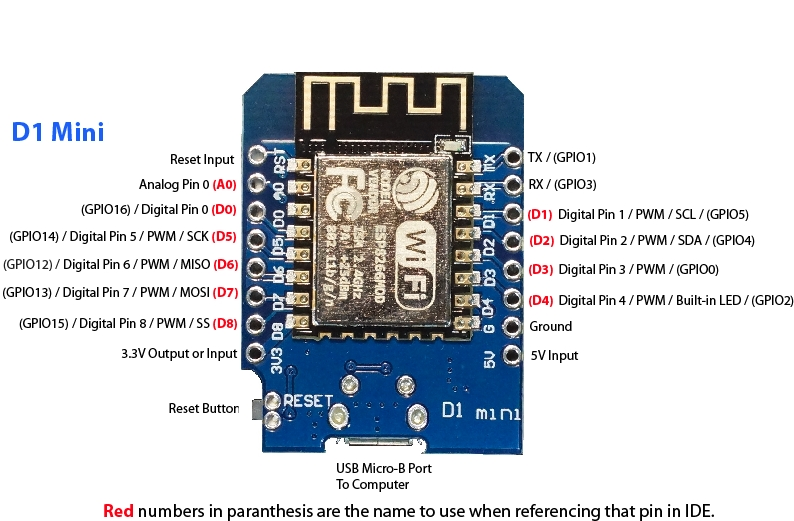
The D1 Mini is equipped with several , entrances and you can use several turbines, either per zone to have the different consumptions, or hot and cold water (which I have chosen).
- A D1 Mini ESP8266 (between 1 and 3€)
- Resistance of 10k ohms (R1)
- A resistance of 10k ohms (Optional)
- connectors to be able to disconnect the active elements from the passive elements (options, 1€) 2P+3P

Modification of turbine wires and temperature sensor
In order to detach the D1mini and the probe, I preferred not to weld them together.
On my first turbine : So I use simple connectors (I only had 4Ps on hand) , which gives:

- The temperature sensor is equipped with two black wires, so no difficulty, no sense, I welded one black wire on the white wire and another black wire on the yellow wire
- The flow sensor is equipped with 3 wires, I kept the colours.
On the second turbine, I chose a model with connectors


So I bought some corresponding connectors, making it even easier to connect.
Broaching of the D1 Mini
Here is the wiring

In this scheme, I chose to replace the yellow yarn with a green yarn because the yellow was not visible. And to avoid confusion between 3.3V and 5V, I represented one in orange and the other in red. This will need to be adapted to the (optional) connectors explained in the previous paragraph.
Some elements of understanding
The temperature sensor is a thermistor, i.e. it changes in value as a function of temperature. So I test it on a divider bridge with a resistance of 10K (this value corresponds to the value closest to the temperature probe at 25°C) and this analog information enters the D1Mini on its analog input A0
The flow sensor as for it gives digital information so to connect on a digital input, I chose D5 (and D7 for the second), other inputs were problematic during my tests. It is powered only by 3.3v because 5V on a digital input would grill the circuit. I added a pull-up resistance, it is not necessarily useful, the Wemos often has an integrated resistance, but given the price of a resistance, I did not hesitate. It is located between the data terminal and +3.3v. On the second turbine I did not put any resistance to test the difference, there is ultimately none.
Configuration of ESP D1 Mini
There are several methods to exploit Wemos and compatible products, I chose to use ESP Easy which I already use a lot with Sonoffs. Note that this part can be adapted to any ESP. My goal in taking the D1 Mini was to be independent so I wanted to avoid using a raspberry or arduino that would also be useful for something else.
The power supply for the D1 mini, I prick it on a USB of a nearby computer equipment, without a nearby USB power supply, you can use a phone charger or any system that allows you to have 5v.
The configuration of the D1 mini is detached from this tutorial for simplicity, it is necessary to have dedicated articles, it is therefore necessary to:
- Flash the D1 Mini
- Connect the D1 Mini to Wifi
- Assign an IP address to the D1 Mini
- Integrate the D1 Mini into Jeedom
Setting up ESP Easy
Beyond the usual settings to be configured in ESP Esasy (specified in the links above), it is interesting to zoom in on the elements specific to this tutorial:
Device tab


- Warm corresponds to the turbine on the hot water network (at the outlet of the balloon)
It is connected to the D5 digital input (so GPIO14)
I chose to set a refresh interval to 2s but it is not mandatory, it is just to see the meter mounted when you open the water.
Three numeric values are given by the probe, I have chosen to delete the decimal places. The total value is to be divided by 390, I explain below how to find the denominator of this division.


- Temperature corresponds to the temperature of the hot water
Note 03/04/2022 On a the Benevolent Council of Seb821, I connected the thermistor to 3.3V and not 5V.
It is connected to analog input A0
I chose to take only integer values, this limits links to Jeedom and unnecessary storage of information.


- Cold corresponds to the turbine on the general inlet of the cold water network (optional)
It is connected to the D7 digital input (so GPIO13)
Three numeric values are given by the probe, I have chosen to delete the decimal places. The total value is to be divided by 408, I explain below how to find the denominator of this division.
Hardware tab
This does not seem mandatory, but I have become accustomed to specifying what I intend to do with the D1Mini pins, so I have configured the two digital inputs I use as follows:

As I2C is not used, I disable everything:

Tools / Advanced tab
It is totally useless but it is cleaner, I put an NTP server so that the D1 is on time (192.168.1.1 is my Syno Router)

Disabling serial port is also a good practice

Calibration of probes (turbines)
The probes have a necessary calibration, the turbine responds to a number of revolutions per minute and we would like liters of water.
There is no miracle recipe, each turbine having its own physical constraints, at our level, a ‘bucket filling’ test will make it possible to calibrate the probes very well.
Here is how to do it:
- Don't put anything in TotalChaude's Formula column

- Raise the value of TotalChaude: (e.g. TC1=1000)
- Take a jump and fill 5 litres of water (e.g. Jump=5)
- Raise the new value of TotalChaude: (e.g. TC2=2950)
The index shall be I=(TC2-TC1)/Saut or (2950-1000)/5 ) = 390
And the formula to add will be %value%/390
Configuration in the ESP Easy plugin
The D1 Mini is therefore a device of the ESP Easy plugin

ESP Easy device data arrives as info commands in the plugin:

Harnessing data in Jeedom
This paragraph is very important. It is necessary because the totals (cold water conso + hot water conso) measured are not kept in the D1Mini. in the event of a power cut, the meters start from zero !!!
For this, I use 2 scenarios + 1 virtual.
 +

Calculation scenario Total Hot water
I describe only the hot water scenario, the cold water scenario is the same in logic.
It is a change in value TotalChaude This triggers the launch of the scenario:

Here is the scenario as a whole, I will detail below:

To have the full text version:
– Scenario name: Hot water Total calculation
– Parent subject matter: Cold Hot Water
– Scenario mode: provoke
– Event: #[Cold Hot Water][D1Mini][TotalChaude]#SI #[Cold Hot Water][D1Mini][TotalChaude]# > variable(Total Hot water Previous)
THEN
(variable) Assignment of variable: Total Variable Hot Water(Total Hot Water) +#[Cold Hot Water][D1Mini][TotalChaude]# – variable(Total Hot water Previous)
SINONSI #[Cold Hot Water][D1Mini][TotalChaude]# < variable(Total Hot Water Previous)
THEN
(variable) Assignment of variable: Total Variable Hot Water(Total Hot Water) + #[Cold Hot Water][D1Mini][TotalChaude]#
SINONACTION
(variable) Assignment of variable: Total Hot water Previous to #[Cold Hot Water][D1Mini][TotalChaude]#
And deactivated:
ACTION
(variable) Assignment of variable: Total Hot water Previous to 0
(variable) Assignment of variable: Total Hot water at 0
Before explaining the scenario, it is useful to specify that the greyed-out part is to be activated only once to initialise two variables (Total Hot Water Previous and Total Hot Water) to zero.
- The variable Total Hot water Previous remembers the last value of the hot water meter

The first test verifies that the new value of the hot water meter is higher than the previous value received from the meter (which is the usual operation)
In this case, the Total Hot Water variable takes the value of: variable(Total Hot water) +#[Cold Hot Water][D1Mini][TotalChaude]# – variable(Total Hot water Previous)
Example:
- #[Cold Hot Water][D1Mini][TotalChaude]# = 809
- variable(Total Hot water Previous) = 808
- variable(Total Hot water) = 3750
Total Hot water=3750+809-808=3751, the new value of the hot water meter will be 3751

The second test checks if the new value received from the hot water meter is less than the last value recorded, this means that the D1 meter has returned to zero in the meantime.
In this case, the Total Hot Water variable takes the value of: variable(Total Hot water) + #[Cold Hot Water][D1Mini][TotalChaude]#
Example:
- #[Cold Hot Water][D1Mini][TotalChaude]# = 3
- variable(Total Hot water Previous) = 808
- variable(Total Hot water) = 3751
Total Hot water=3751+3=3754, the new value of the hot water meter will be 3754

This last block records the last value of the hot water meter (#[Cold Hot Water][D1Mini][TotalChaude]#) in the variable Total Hot water Previous. This value is important, it is tested to find out which of the two previous blocks is used to calculate the value of Total Hot Water.
The Virtual Cold Hot Water
Nothing very complicated, we recover the variables variable(Total Hot Water) and variable(Total Cold Water)

Graphs
Since the values of cold water and hot water are recorded, you might as well enjoy it by displaying it on its design
Here are examples of graphs, everyone will be able to do what they like.
- Consumption of the day

- Monthly consumption
As this graph is the most interesting, I detail it:


You must choose the "Column" mode and choose "Summary per day". Put one of the two ladders visible.

Changes and improvements
- 03/04/2022: The thermistor should instead be connected to 3.3V to protect the Analogue input, modified diagram, thank you Seb821.
- To study a solution to avoid the refresh to 2s, can be with the rules (rules) of Esp Easy
 English
 French
 Spanish
 Chinese
 German